While I love this blog, I now pretty much only write on my other two blogs: BirdingBlogs.com and 10,000 Birds - I would love to see you there!
Showing posts with label Birding Tips. Show all posts

Thursday, 30 April 2009

Looking for Common Swift and Pallid Swift (and how to identify them)

It is still snowing in the Alps. Yesterday and today, the snow line has dropped down to only about 1000m, that is fairly close to the valley floor and certainly exceptional for this time of year. Winter is really trying its hardest to hang on this year (but Mrs Spring has other ideas!).


But yesterday, with the foul weather, came the Common Swifts. Finally they got here! and as soon as the sun poked out a little bit, they were all over the place. It is incredible how the swifts seem to arrive in their droves when they eventually arrive. On Sunday, I was in Südtirol (the Italian province bordering Austrian Tirol) and saw quite a number of swifts about there, but it took another good few days before they really took the plunge in to the mountains.

One of my aims this year is to find the Pallid Swift. We saw lots of them when we were on the Spanish Costa Brava last year, and I got quite familiar with them. The thing is, they are apparently moving more and more northwards from their traditional summer haunts on the Mediterranean coast, but the thing is that they are so similar to the Common Swift that unless one is actually looking for them, I think that they are bound to be missed most of the time.

Their call is the easiest way to tell the Pallid Swift apart from Common Swift. Listen to the call of the Common Swift here (from garden-birds.co.uk) and then compare it to the call of the Pallid Swift (played from Xeno-canto.org). Now, I am not saying that they are worlds apart, just that with practice, you can tell they are distinguishable. What complicates matters is that they are often in mixed flocks, so what you could try doing is taking some photos of the two, and then trying to ID the two swifts from the photos.

The Common Swift tends to have thinner, more pointed wings, overall a matt, darker colour, and a small, but clear throat bib. The Pallid swift is often browner (somewhat paler), has a heavier build, and more likely to have a larger, diffuse pale patch on the throat. Because of the "heavier" body form, the Pallid Swift can often seem to have a clear waistline where the chunky body reduces down to the thinner tail region. The three top tips for spotting a Pallid Swift in a crowd are probably to look for:
  • the hips
  • paler secondaries on a brown background when seen from above (common swift is uniformly dark), and
  • the "feather scaling". particularly the breast plumage will often appear to be scaled as the dark brown coloured feathers can have a lighter border to them

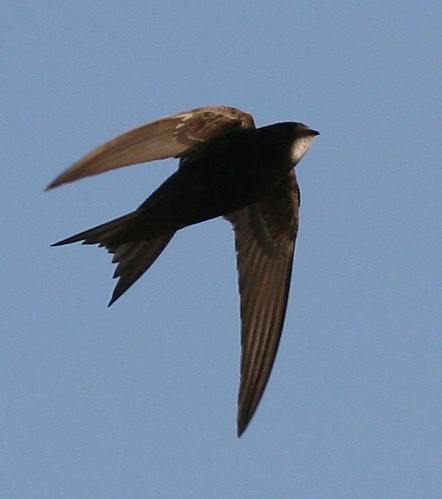
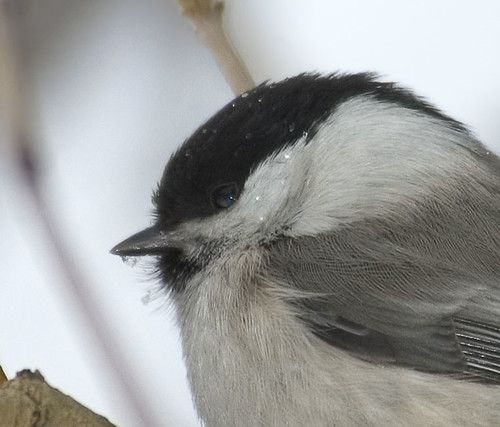
Common Swift (Mauersegler, Apus apus) by Muchaxo.
notice the matt belly colour, no hips, neat little white throat, no black "Zorro" eye patch, pointy wings, and no scaling.


I found trying to look at the extent of the throat patch and the pointedness of the wings to be very unreliable swift identification features in the field. When first getting used to the pallid swifts and common swifts, I tried as hard as I could to listen carefully (as usual, it helped to have local pro ornithologists and birders about) and took lots and lots of photos. Most of the time, it turned at that there were both pallid swifts and black swifts all mixed up in the same flock. But with a bit of practice, it got easier.

If you live in an area north of the regular breeding area, a good tip is to look out for swifts that are unusually early or unusually late. Because they tend not to migrate as far as the common swifts, the pallid swifts tend to be less keen to migrate back to their "winter" homes down south.

For more info on the Pallid Swift/Common Swift identification debate, you may want to look up some of these links:
Related Birdforum thread on Pallid/Common Swifts
(with some photos and little consensus)
If you understand Italian then try here

For photos of Pallid Swift, please see my follow-up post, here.
For other blog posts on swifts, and Alpine Swift, click on the links.

Happy birding, and good luck finding both swift species!
Dale Forbes


p.s. I am writing this from a hut in the mountains (heading out to look for Rock Partridge, Ptarmigan and Black Grouse in the morning early). When I get a little bit of time with my external hard drive, I will be able to get some Pallid Swift photos up here.

Monday, 30 March 2009

Birding Tips 4: Willow Tits and Marsh Tits

Both the Willow Tit (Weidenmeise) and the Marsh Tit (Sumpfmeise) are fairly common here in Tirol, but I don't think I have ever seen them together, or even near each other.

The Willow Tit is most commonly found up near the edge of the tree line, and in the forest edge habitat alongside the high, mountain pastures (think Heidi and Peter playing in the fields). The easiest way to find them while birding is to just keep a look out for any little birds moving about (there are bound to be few, you are birding in the high Alps after all ;-), and keep your ears open for their call (play here from www.garden-birds.co.uk). The rasping sound carries fairly well in the forest and open habitats.


Willow Tit showing pale wing windows, large black bib, white ears, and bull neck; originally uploaded by Sergey Yeliseev.

As with most birds up in the Alps, you can be walking/birding for hours in the right habitat and not find anything and then suddenly, a flock flies up and lands in the tree right in front of you. Besides active searching in the high mountains, don't forget to check the gardens and bird feeders of houses or settlements in the mountains. Last weekend we saw quite a few Willow Tits hanging out and feeding in the garden of a small Alpine hamlet (see Juifenau location / sighting). Despite what my Collins Bird Guide says, Willow Tits do feed at winter feeding tables, at least here in the Alps.

Having said that, if you see tits feeding at a winter feeding table, it is way more likely to be a marsh tit than a willow tit. Marsh Tits are fairly common in the gardens and riparian woodland of Innsbruck and the surrounding villages, particularly those along the River Inn, and I often come across Marsh Tits while birding in my local patch (the Inzinger Gaisau). The marsh tits tend to be in lower lying areas, often somewhat near water and seem to really love broad-leaved riparian woodland. Keep an ear open for the marsh tit call (play here from www.garden-birds.co.uk). For tits, they can be a little more weary than some of the other tit species, but I would certainly not call them shy.


Marsh tit, showing brown (not pale) wing windows, smaller bib, buff ears, and a hint of white at the base of the bill; originally uploaded by giuss95.

The best way to tell a marsh tit from a willow tit is by call (try listening to the calls above a few times). If, like me, you suck at remembering a million birds' million different calls and songs, then you may have to rely on some more creative methods.

The first involves putting the calls on your mobile phone, mp3 player or pda so that you always have samples of the calls with you when you need to tell them apart.

If that is not an option or you are feeling visually inclined, then here are a few physical features you can use:
  1. the willow tit is characteristically bull-necked. Because it excavates its own breeding cavity (unlike the marsh tit), it has a much sturdier and thicker neck. This is not always that obvious and a marsh tit can look large necked as well, depending on its sitting position
  2. if you are able to get a good look at the bird, then look for a lighter/pale dot at the base of the bill. If so, then you are almost certainly looking at a marsh tit.
  3. the white cheeck patch of the willow tit appears to extend well back, all the way to the extension of the black hood on to the nape. in the marsh tit, the whiteness of the cheeks quickly changes to a light buff over the ears
  4. willow tits tend to have a pale margin to the secondary flight feathers, giving them a "pale window" effect on the folded wing (this can be lost with lots of feather wear). Marsh tits can have something similar, but generally to a much lesser extent, and only when the feathers are really fresh.
  5. The chin bib of willow tits tends to be larger with a greater scattering of dots than that of most marsh tits.


Willow Tit, showing extensive white cheek and ear patches, a fairly broad bib, and no white at the base of the bill; originally uploaded by Sergey Yeliseev.

With a little practise, identifying marsh and willow tits is not all that hard, but it always takes looking at a couple of features before deciding on an ID. For a more in-depth look at marsh and willow tit identification, refer to Brian Stretch's identification article (here).

Happy birding
Dale

Tuesday, 27 January 2009

Birding Tips 3 - Digibinning with the Swarovski Optik Snapshot Adaptor

The Alps are mountainous.
Walking here is not always easy.
and dragging a telescope and digiscoping setup with wherever I go is not always an option
(or at least not a preferred option ;-)

Particularly now in winter, I am finding very few good digiscoping moments and so I am tending to take advantage of the snowy winter wonderland that is Tirol to go walking, back-country snowshoe hiking, and skiing and most of the time my great big telescope (a beautiful Swaro ATS80) gets left at home.

But I invariably have a pair of binoculars with me when I go out hiking (well, you never know when you are going to come across a feeding/breeding flock of energetically brightly coloured crossbills). Then, if I do come across something interesting, I can always snap off a few photos through my binoculars.

Taking photos through binoculars (digibinning) can be a lot of fun, but is not always easy and I do a fair amount of digibinning with varying success. Sometimes the pictures are gems. Othertimes, not so much. The most important factors are:
  1. the amount, direction and quality of the light, and
  2. the distance the bird/subject is away
Obviously, the more light, the faster the shutter speed can be, and the greater the chance of getting a sharp photo. Digibinning seems to be particularly sensitive to light direction/angle. Backlit subjects and lighting from in from of the objective tends to give the images a washed-out blue tinge that is really hard to deal with/get rid of and even if there is a fair amount of light about, backlit images (even mildly so) can be very hard to expose correctly without blowing out the background. Getting the right light direction is crucial to taking the shot. As with all photography, the quality of the light also has a great influence on how your digibinning photos turn out. Softer (not uni-directional) light is best, so early morning and late afternoon can give you good light quality, but remember that at these times, the quantitative lack of light may make it difficult to get an adequate shutter speed.

The second point - the distance to the subject/bird - is related to the first. If your subject is relatively distant then you may need to use more of your camera's zoom, which reduces your maximum shutter speed quickly. The other consideration is that our little point and shoot digital cameras often have rather poor optical zoom quality and digibinning photos suffer noticeably (and quickly) when you crank up the zoom. Always use as little camera zoom as possible.

In terms of camera and binocular setup, there are three key considerations:
  1. binocular quality
  2. camera quality
  3. joining or adapting device (snapshot adaptor)
The quality of the binocular you use for digibinning is paramount. I cannot stress this enough. Under the same conditions, a mid-range or cheap binocular will never work as well as something like a Swarovski binocular. At the moment, I tend to pick up my Swarovki EL 8,5x42s first. The optical quality is incredible, they are bright (with a 42mm objective), have a good field of view, have good eye relief (important for digibinning), and are colour neutral. This last point is - for me - rather important for photography through binoculars, and - for example - the Zeiss Victory FL are blue skewed - a killer for digibinning.

Obviously, the quality of your camera will make a difference to your photos. This effect is minimized by keeping the ISO rating as low as possible, and by avoiding using the zoom (optical or digital) as much as possible.

Swarovski Optik have produced a lovely little adaptor that makes taking photos through binoculars incredibly easy - the snapshot adaptor. Below is a video of Clay Taylor (Swarovski Optik North America's resident digiscoping and optics expert) explaining how to use swarovski's snapshot adaptor.


Happy birding
Dale

p.s. if this post interested you, you might also want to see this older post.

Friday, 28 November 2008

Birding Tips 2: Lens Cleaning

Like most birders, I only tend to think about cleaning my dirty binoculars when I am out in the field. The challenge, of course, is then 'how does one clean a binocular or telescope lens in the field with out scratching that seriously expensive glass?'


Using your T-shirt is certainly the most commonly used method but probably not the best of ideas. I would be a telling a filthy lie if I said I had never used a dirty, sweaty T-shirt to clean off my fancy-shmancy Swaros. But I have learnt my lesson. At some stage I realised that it really was not a train-smash if I was caught out in the field without one of those cute little optics manufacturer-designed cleaning kits. mmm, is it bad luck to talk about rail accidents when one is travelling on a train? Hope not.

Nowadays, if I really have to clean my binocular or telescope lenses out in the field then I tend to rely on one of two methods:
1. blow off as much stuff as possible; pour water over the lens to wash off most of the grime; and then use my finger to gently wash the lens; finish by blowing off excess water and then using a MICROFIBRE cloth to give a final clean
2. Blow off; Lick (yes, lick it with your tongue - it is extremely effective!); MICROFIBRE

Not having a microfibre is not the end of the world, either. Just use the first method and try to blow off as much of the water as possible (this will help reduce the water-spots on the lens). This will normally suffice until I can get home to a microfibre cloth or borrow one from a fellow birder.

Birders spend a lot of hard-earned money to have beautiful equipment and I don't think it is that hard to keep them in good nic.

Happy birding
Dale

Tuesday, 25 November 2008

Birding Tips 1 - binocular harness

my entire birding life, i have stuck to using a normal carrying strap with my binoculars. when working in costa rica, I had my binoculars with me all day, every day and was always on the lookout for scarlet macaws (the species I was working on at the time). Because of the long hours carrying binoculars, I used to sling them across my shoulder (like a beauty-queen's sash). and I found that this was quite comfortable for me.

but, I have recently started to use a binocular harness (binocular suspender) and have found it incredibly comfortable. It seems that binocular harnesses are rather popular in the United States, but are thought of as completely silly most everywhere else. Well, to be honest, I still think they look silly - as though I have a kiddy/doggie lead attached to my back so that my wife can reel me in when I stray too far. (oh please, no one give that idea to my wife! that will be the end of searches for elusive Ivory-billed Woodpeckers and such like). But, at the end of the day, my neck is really starting to appreciate the binocular harness.


Essentially, in stead of having just one strap that distributes the weight of the binoculars around the neck, the principle behind the harness is that the weight is split and supported by the shoulders. harnesses are generally adjustable so they can be made to fit over just about any clothing, and their elasticated straps tend to allow for a better and more comfortable fit.


At first, I did not really like that there was tension on the elastic holding straps when I was looking through the binocualrs, but as I used it more, I started to appreciate the added stability this system gave me - the slight tension tends to hold the binoculars in place in a suspension tripod-effect.

The binocualrs tend to sit close to the chest with less pendulum than I am accustomed to with a neck strap, and the handy little quick-release clips mean that I can get the binoculars on and off quickly (particularly important when I want to lend my binoculars to someone quickly).

If you tend to carry your binoculars around for hours on end, have a bit of a hand-tremble, or tend to have neck trouble, then I would strongly recommend trying a binocular harness out.

Happy birding
Dale